RSS

Tofu Stir-Fry

Tofu. I’m not sure about you– but let’s just say this wasn’t my idea of “yum” just a few years back. Diets do interesting things to you, and this recent one has gotten me trying many new things. As children, my sisters and I would tease our mom when she had tofu. Well, I have had to literally eat my words, because I’ve grown to like it! I enjoy eating it in all sorts of things, but most especially I love it now in stir fry!


Besides the fact that tofu is very healthy for you, it leaves you with a light but satisfied feeling. You won’t feel overstuffed or bloated after you have this dish. Even my husband, who I was a littler nervous for, looked down at his plate asked if this was tofu, proceeded to take a bite and said “it’s good!”. 🙂


Ingredients:

1 tablespoon canola oil

1 carrot, sliced on diagonal

2 tablespoons minced peeled fresh ginger

4 garlic cloves, minced

1 pound broccoli crowns, cut into small florets

1/4 cup reduced- sodium vegetable broth

1 pound reduced-fat firm tofu, cut into 1/2 inch cubes

8 shiitake mushrooms, stemmed and caps thinly sliced

1 red bell pepper, julienned

1 onion, sliced

1 tablespoon soy sauce

1 1/2 tablespoons asian sesame oil

pinch red pepper flakes


Directions:

1. Heat nonstick wok or deep large nonstick skillet over high heat until drop of water sizzles in pan; add oil and swirl to coat pan. Add carrot and stir-fry 1 minute. Add ginger and garlic; stir-fry 30 seconds. Add broccoli and broth; cook, covered , 2 minutes

2. Add tofu, mushrooms, and bell peppers to wok; stir-fry until bell pepper is soft, about 3 minutes. Add all remaining ingredients; stir-fry 1 minute longer


*taken from Weight Watcher’s New Complete Cook book

 
1 Comment

Posted by on August 21, 2012 in Main Dish, Peppers, Rice, Tofu, Vegetable


Tags: , , , , ,

Blueberry Pie

Some people have knacks for different things: a natural green thumb, the ability to see a design in their head, or maybe to be able to whip up any sort of pie on any occasion. Let’s just say my talents do not lie in the latter- or so I thought. Berry Pies have always been my great nemesis- I remember distinctly crying on several occasions over how awfully soupy it was or that I got the sugar ratio horridly wrong. For those of you who fear pies or berry pies at least (which I find the hardest kind), have no fear. This is a fail safe recipe! Why? because you get to cook the cornstarch BEFORE you hide it in the pie. There is no crossing your fingers and praying that your pie will not be runny, no more cringing as you cut into the first piece– you can confidently serve this pie to your best company!

So why you might ask did I decide to attempt a berry pie? Our first anniversary! I wanted to do something special as a dessert- what better for the man that should have “blueberry” as his middle name?! 😉


Filling:


Pastry:

  • 2 cups all-purpose flour
  • 1 tablespoon sugar
  • 1 teaspoon salt
  • 3/4 cup shortening
  • 1 egg
  • 2 tablespoons water
  • 1/2 tablespoon vinegar
  • Flour, for dusting
  • Sugar, for sprinkling on top


Directions

Filling: Combine sugar, cornstarch, cinnamon and water. Add to a saucepan and heat rapidly until thickened. Set aside to cool as you prepare the pastry. Once cooled add the berries and lemon juice.

Preheat oven to 425 degrees F.

Combine flour, sugar and salt. Cut in shortening. Whisk together egg, water and vinegar. Add to flour mixture tossing lightly with a fork. Turn out onto a lightly floured cutting board and using your hands combine dough. Separate into 2 single crusts. Line the bottom of a pie plate with 1 of the crusts.

Pour filling into dough lined pie pan, and sprinkle the lemon juice over the filling. Adjust top crust, cut vents and flute rim. Sprinkle top lightly with sugar. Place pie onto a baking sheet and into the oven for 20 minutes. Reduce heat to 350 degrees F and bake for an additional 20 to 25 minutes. Allow to cool, cut and enjoy!


*Taken from Food network’s website under “Country Blueberry Pie”


4 Comments

Posted by on August 13, 2012 in Berry, Blueberry, Dessert, Pie


Tags: , , ,

Chili Chicken and Potatoes

It has been quite a few months since I have blogged in any way about my food. Recently by the advice of some wise counselors, I was advised to not share recipes that were my own creation, but instead to save those in case I might like to publish them someday. Seeing as most of my cooking tends to be from my head or a derivation off of some recipe, this posed as a problem for my blog. 

Lately though, I have felt the itch to try new recipes and venture off in directions that are not “home base”. In doing so, I need to follow recipes since I am not yet comfortable with all of these spices or instinctively knowing which of these new flavor “colors” should go where. 

My husband and I have been frequenting more and more Indian restaurants as of late- and when these potatoes mentioned some fun spices- I got to thinking that this dish is “spicy” but more in the sense of an Indian “spicy” rather than a HOT spicy.

Chicken:

5-7 chicken drumsticks, bone in, skin removed

1 tablespoon chili powder

2 teaspoon paprika

1 teaspoon dried oregano

1 teaspoon ground cumin

1 teaspoon salt

2 garlic cloves, minced

1 teaspoon Cayenne Pepper (optional)

Place racks in middle and lower third of oven. Preheat oven to 375 degrees F. Place rack in roasting pan; spray with nonstick spray. Spray 9×13-inch baking dish with nonstick spray.

To make spice paste, stir together chili powder, paprika, oregano, cumin, 1/2 teaspoon of salt, and the garlic in a cup. Add enough water to form thick paste. Spread over the chicken.

Potatoes:

3 (10 ounce) baking potatoes, quartered lengthwise.

2 tablespoons of Italian seasoning

1 tsp of salt (or more to suit your taste)

Roast chicken on middle oven rack until instant-read thermometer inserted into drumsticks (not touching bone) registers 180 degrees F, about 1 hour.

Meanwhile, put potatoes in prepared baking dish; lightly spray with nonstick spray and sprinkle with remaining 1/2 teaspoon of salt and additional spices. After chicken has roasted 20 minutes, put potatoes on lower oven rack and roast, turning once or twice, until tender and lightly browned, about 40 minutes.

 
Leave a comment

Posted by on August 9, 2012 in Chicken, Main Dish, Meat, Potatoe


Tags: , , , , , , , , , ,

Jambalaya

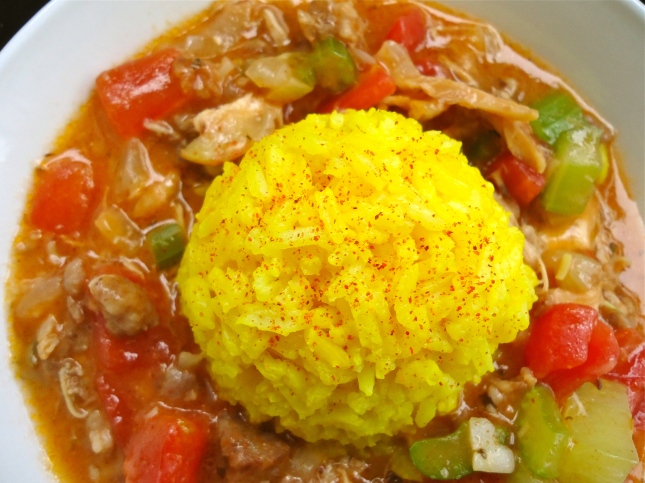
Awhile back, my husband got enthralled with the show “Swamp People” awhile back. I would occasionally peer over to see what it was he was so interested in, but mostly I just let him tell me about it. Apparently, sometimes the “swamp people” would also cook things. One episode, they must have referred to “Jambalaya” or something, because Tom started asking about it. I explained how it’s a Cajun dish and it generally has shrimp and beef and chicken and rice in it with a nice smattering of vegetables. Ever since that day, it’s come up in conversation now and again with Tom always being curious how it tasted. On a whim, he requested to make jambalaya today. Well, I don’t usually keep frozen shrimp on hand or fresh for that matter, so I made a jambalaya without it. Let me tell you though, it turned out beautiful! Tom loved it so much, he had three bowl-fulls! 


  • 2 c uncooked rice
  • 4 c water
  • 1/8 c turmeric
  • 1 tbs olive oil
  • 2 lbs boiled chicken
  • 1 lb boiled sausage (mild or hot)
  • 2 medium onions, diced
  • 4 ribs celery, chopped
  • 1 bay leaf
  • cayenne pepper
  • 1/3 c flour
  • 14 oz. diced tomatoes
  • 2 cups homemade chicken stock
  • 2 tsp cumin
  • 2 tsp chili powder
  • 1 tsp Worcestershire sauce
  • 1 tsp thyme
In a medium pot, fill halfway with water, and bring to a boil. Add chicken, and let boil. In another medium pot, fill with water and bring sausage to a boil. In the meantime, dice onions and celery. When sausage is cooked thoroughly, remove from pot, and remove skin from sausage. Dice sausage. Set aside.
In a third pot, measure out four cups of water. Add 2 cups of white rice. Add turmeric. Bring to boil, and then reduce to a simmer.
Return to your boiling chicken, check for doneness and meat falling off the bone. Remove from boiling water, and debone chicken. Reserve chicken stock.
In a frying pan, brown the chicken and sausage in 1 tbs of olive oil. Add celery and onions, when onions become translucent, sprinkle with flour and cook two more minutes. Then, add diced tomatoes and juice, chicken stock, cumin, chili, cayenne, bay leaf and Worcestershire. Bring to a boil.
Ladle broth into a bowl and top with a scoop of rice. Enjoy!
 
15 Comments

Posted by on January 17, 2012 in Chicken, Main Dish, Meat, Onions, Pork, Rice, Vegetable


Tags: , , , , , , , , , , , ,

Cinnamon Chocolate Cupcakes

I have always had a fascination with cupcakes, especially now with the new “cupcake wars” show that is on food network. 🙂 We did not have cupcakes in my household when I was growing up. The closest thing we ever had was when my mom made little itty bitty cheesecakes that you made in muffin tins… but no cupcakes. So I have always had this desire to MAKE a cake or a cupcake. So here are to my first cupcakes! I couldn’t seem to find a recipe that I liked, so this is a creation all of my own, but, I think they turned out gorgeously! A soft almost savory cocoa cupcake mixed with the sweet smooth seductiveness of the cinnamon buttercream frosting is sure to be a major hit! 

  • 1 1/2 sticks butter, room temperature
  • 1 1/4 c sugar
  • 2 eggs
  • 1 c cocoa powder
  • 2 tsp cinnamon
  • 2 tbs vanilla extract
  • 1 c buttermilk
  • 1/2 c sour cream
  • 1 3/4 c all purpose flour
  • 1 1/2 tsp. baking soda
  • 1/2 tsp salt

Preheat oven to 350 degrees F. Line cupcake pan with liners. Cream butter and sugar until light and flurry. Lower, add eggs, vanilla, and cinnamon. In a separate bowl, whisk together buttermilk and sour cream. Set aside. In another bowl, sift four, cocoa, baking soda, and salt. Add buttermilk mixture and sifted mixture to creamed butter mixture. Beat until combined, being careful not to over beat. Using an ice cream scoop, divide into cupcake tins, being careful to be consistent in size. Bake 20 to 25 minutes or until a toothpick comes out clean. Let cool for 10 minutes, and then release from the pan and set on rack to cool.

Cinnamon Buttercream Frosting

  • 1 stick softened butter
  • 4 oz. cream cheese
  • 2 tsp cinnamon
  • 1 c powdered sugar
  • 1 tbs vanilla

Whip butter, cream cheese, and cinnamon together. On a slow speed, slowly incorporate powdered sugar. Add vanilla. You can spread with a spatula onto cooled cupcakes, or pipe with a piping bag.

 
23 Comments

Posted by on January 16, 2012 in Chocolate, Cupcake


Tags: , , , , , , , ,

Date Raisin Apricot Cookies


So on this night that I made three loaves of bread, I was feeling especially creative. I had recently bought some dates from the store and was itching to use them. I started looking up recipes, and flipping through food magazines and cook books to see what recipes I could find that included dates. I wasn’t really finding a lot of “simple” things, after all, I’d already baked 3 loaves of bread and it was nearing 10 o’clock at night. I knew that Tom would be home in about an hour. Finally fed up with what I was finding, I decided to come up with my own on-the-spot cookie. “How hard could it be?”, I thought. I’ve made cookies since I was a child, most cookie recipes have basically the same sort of base. So I started making my little “date” cookies, and then suddenly I thought to add raisins to it, and then what about apricots? And soon the spices and creativity were flowing through my blood, and Viola! One of the best cookies I’ve ever tasted! 🙂 I often bring my cookies and treats to my work place, just to let people help me and Tom eat some of the goodies I make. Though I live in Chicagoland, there are still a lot of people who are reticent to new or “exotic” groupings of food. I even had a friend say “I would not normally try THAT combination…. but since you made it, I’m going to be open minded and give it a try” 🙂 and to her delighted surprise, she loved them! 🙂 I always have delight in “beating” people’s food dislikes. My husband has often gone on about different foods he didn’t like, and at about maybe a 98% success rate on my part, I’ve been able to convert him over on most of them. 🙂 


  • 1/2 cup butter, softened
  • 1/2 vegetable shortening
  • 1 cup brown sugar, packed
  • 1 tbsp black strap molasses
  • 2 tbsp vanilla
  • 1/4 tsp cinnamon
  • 1/8 tsp nutmeg
  • 1/8 tsp cloves
  • 2 eggs
  • 1/2 cup chopped, pitted dates
  • 1/2 cup raisins
  • 1/2 cup chopped dried apricots
  • 2 cups rolled oats
  • 2 cups flour
  • 1 tsp baking soda


Preheat oven to 375 degrees F. In a large bowl, mix together butter, shortening, and brown sugar. Mix until smooth and without lumps. Add molasses, vanilla and eggs. Beat by hand in bowl until sugars start to dissolve. Add dates, raisins and dried apricots. In a separate bowl, mix together cinnamon, nutmeg, cloves, flour, and baking soda. Slowly add dry mixture to wet, mix well. Add rolled oats.


On a non-stick baking sheet, drop cookies, being sure to make them uniform size. Bake for 8-10 minutes or until just lightly browned on tips. Release from pan and cool on rack. Enjoy!

 
11 Comments

Posted by on January 13, 2012 in Cookie


Tags: , , , , , , , , ,

Braided White Bread

Like I said, I’ve been having quite the fascination with baking bread. The other night, I made 3 loaves of bread AND a batch of cookies! I’m not quite sure what got into me, but it was fun 🙂 After having so much success with the bread that I’d made, I wanted to “do it again”! Like I said, there’s something marvelous about rising bread…. it’s almost like it’s alive, like your little pet or something! HA! 🙂 anyway, so I hopped back online and looked for another recipe to attempt, not complicated, but different than what I did before. Of course! Why not a braided bread? Lovely AND different! I have to admit, this one made me think of my mom. It seemed when I was very young was when my mom baked the most. Being the youngest of four children, I’m not surprised if she probably was “worn out” after making treats and sweets and breads for all my other siblings, but for some reason, I only remember a lot of homemade breads and such when I was very young. The braiding part of it reminded me of all the pretty Easter breads my mom used to make, or all the soft pretzels we used to enjoy as children. 🙂 I even vaguely remember a blueberry braid that my mom made one time, or maybe it was several times, but that was a beautiful thing. Another Sunday morning favorite, I’ll have to get the recipe sometime. 


  • 3 cups flour
  • 3 tsp active dry yeast
  • 3 tsp sugar
  • 1 tsp salt
  • 1 cup of warm water
  • 1 tbsp butter, diced
  • 1 egg, beaten

Attach dough hook to mixer, add flour, dry yeast, sugar, salt, and warm water. Add more water if necessary, paying attention to the consistency of the dough. Add diced butter, mix. Adding a little flour, knead dough inside of bowl or on floured surface. Let rest for 10 minutes.


Roll dough out into a log, and cut in half. Roll out each half. The ropes should be 15 inches long approximately. Connect their ends together and begin to “braid” them or “twist” them, whichever you prefer. Place into greased pan, and brush with beaten egg. Preheat oven to 350 degrees F, and bake for 30 minutes. Release from pan and let completely cool before slicing.


2 Comments

Posted by on January 13, 2012 in Bread, White


Tags: , , , , , ,

White Bread

So I’ve begun this little love affair with baking bread. There is something so satisfying in watching a loaf of bread rise! I have to admit, out of all of the things to make in the world of cooking, I find bread to be the most challenging! I know! But, as a dear friend told me, she thought it was hilarious that I found cheesecake easy, I guess that we each have our own strengths. I do hope to master the art someday, but in the mean time, I think I’ll dance happily in front of my covered little bowl as the bread rises and I’ll hope it turns out just right!

There is something just so amazing about fresh homed bread. PLEASE NO BREAD MACHINES! ACK! No, I’m talking about fresh, mixed and stirred by hand, kneaded into submission sort of bread! The kind that looks beautiful and all the sides feel so delectable in your mouth– that’s the kind of bread I’m talking about. 


A shout-out to bread machines– yes, they are handy, and I’m not against using them. Pizza doughs and other doughs for forming breads are much more accessible this way, but if you must use them to make your bread, at least take the dough out and let it bake in the oven!


  • 3/4 cup warm water
  • 1 package active dry yeast
  • 1 tsp. salt
  • 1 1/2 tsp. sugar
  • 1 tbs. vegetable shortening
  • 1/2 cup milk
  • 3 cups all purpose flour, approx.

In a large bowl, dissolve 1 package of active dry yeast in warm water. Stir until dissolved. Add salt, sugar, shortening, and milk to mixture. Mix in 2 cups of flour, checking for dryness or wetness and adding flour accordingly. If the dough seems sticky, continue to add flour, if the dough feels smooth to the touch, you do not need to add more. On a floured surface, start to knead the dough, adding more flour if needed. Knead for 5-10 minutes. Grease bowl and place dough inside, being sure to flip it once to grease all sides of the dough. Let rise in a warm place for one hour.


After one hour, return to dough and punch down and knead quickly. Place bread in buttered or greased bread pan, set in a warm place to rise for 30 minutes. Preheat oven to 375 degrees F. Bake bread for 45 minutes or until golden brown. Release bread from pan, and let cool on rack.


8 Comments

Posted by on January 12, 2012 in Bread, White


Tags: , , , , , , ,

Cinnamon Rolls

When I was growing up, I remember with great fondness how my mom used to make us cinnamon rolls every Sunday morning. To be honest, I can’t remember if she made them the night before or the morning of, but regardless, I still remember looking forward to them every week! I do have to hand it to my mom and my Italian heritage for my love of food. Cooking at a young age and being surrounded by good food has always fed my desire to bake and cook! 

Dough:

  • 1/4 oz. package yeast
  • 1/2 cup warm water
  • 1/2 cup scalded milk
  • 1/4 cup sugar
  • 1/3 cup butter, melted
  • 1 tsp. salt
  • 1 egg
  • dash of cinnamon
  • dash of nutmeg
  • 3 1/2 cups to 4 cups all purpose flour

In a bowl, dissolve yeast in 1/2 cup warm water. Let sit for 5-10 minutes or until the yeast bubbles. In a large bowl, mix milk, sugar, melted butter, salt, egg, cinnamon and nutmeg. Add yeast mixture. Mix in 2 cups of flour, incorporate until smooth. Add remaining flour. Knead dough for 5-10 minutes on floured surface. Transfer to well greased bowl, and place in warm oven*. Let rise for 1 hour to 1 1/2 hours, or until dough doubles in size.

* Preheat oven to 350 degrees F, or lowest temperature on oven, once oven feels comfortably warm, turn off temperature, and place dough inside. If for some reason during the rising process the oven cools off too much, repeat the first step.


Filling:

  • 1/4 cup softened butter
  • 3/4 cup sugar
  • 2 tablespoons ground cinnamon
  • dash of nutmeg
  • dash of cloves
  • 3/4 cup raisins or dried apricots, optional

When dough has doubled in size, punch down and roll out on a flat surface, about a 15×9 rectangle . Spread softened butter over dough, and sprinkle on filling. Press into dough. On the longest end of your rectangle, begin to roll up dough and pinch ends to seal. Cut into 12 to 15 slices.

With remaining butter, spread onto pan. Place cinnamon rolls close in pan, but not touching, leaving room for them to grow. Place back into a warm oven, and let double in size, about 45 minutes. Preheat oven to 350 degrees F, and cook for 30 to 40 minutes, or until just slightly browned on top.


Glaze:

  • 1/4 cup softened butter
  • 2 oz. cream cheese
  • 1 cup powdered sugar
  • 1 tablespoon vanilla extract

In small bowl, combine the butter and cream cheese. Using an electric mixer, beat until smooth. Add powdered sugar and beat in slowly at first, and then on high. Slowly add in vanilla extract until creamy. Frost hot cinnamon rolls, enjoy!


30 Comments

Posted by on January 8, 2012 in Bread, Cinnamon Rolls, Dessert, Sweet Bread


Tags: , , , ,

Decadent Dark Chocolate Cheesecake

My grandmother and I have always shared a love of dark chocolate. When I was in college, Gramma made this dark chocolate cake, and was it divine! Since then, we have commonly referred to it as the “decadent” chocolate cake! 😉

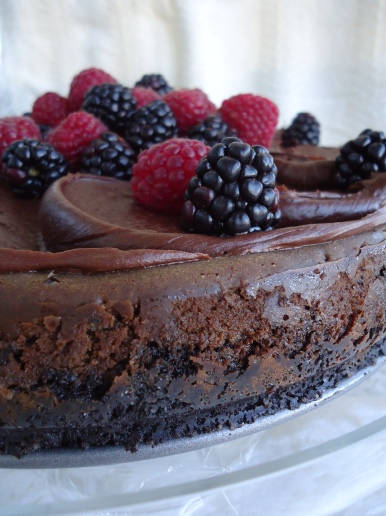
Well, I was merrily making this lovely cheesecake, and it called to add cocoa powder… and somewhere in the back of my head, I remembered that I had a can of DARK CHOCOLATE cocoa powder! I could only imagine that if that decadent chocolate cake tasted so wonderful, that a decadent DARK chocolate cheesecake should taste just as divine!(And wow was I right!)

This cheesecake, by far, is the best cheesecake I have ever made. Many times with cheesecake, you can only have a small bite, a small sampling, or a small sliver of sorts because of the richness and almost cloyingly sweet taste your mouth gets after an entire piece. Not so with this lovely piece! The savory flavors of the dark chocolate, contrasted with the rich flavor of the chocolate crust and the berries on top, create a world of beautiful balance! The only next feeling is that you must have another bite of that!

I would not recommend making this cake, unless you have a special occasion to go to. Why? Merely because, on my own, I would have eaten the ENTIRE cheesecake singlehandedly!

Crust:

  • 2 cups Oreos, ground
  • 4 tbs sugar
  • 6 tbs butter, melted

Preheat oven to 325 degrees F. Combine Oreos, sugar, and butter. Mix with a fork. Press into a 9-inch spring form pan. Bake for 10 minutes. Set aside to cool.

Cheesecake:

  • 3 cream cheese (total of 24 oz.)
  • 3/4 cup sugar
  • 1/4 cup dark chocolate cocoa
  • 1 tbs vanilla
  • 3 eggs
  • Berries of choice for topping

Raise oven temperature to 350 degrees F. Beat cream cheese until it has a light a fluffy appearance. Add sugar and continue to beat on high, making sure to clean off the sides of the bowl to ensure a thorough mixing. Add cocoa powder and vanilla, mixing slowly at first. Add eggs and mix well. Pour cheesecake mixture into cooled crust. Tap the cheesecake on a solid counter to take out any extra bubbles and to help prevent the cheesecake from cracking. Place in the oven, and bake for 35-40 minutes. When cheesecake appears almost completely done, turn off the oven, and crack the door, allowing the cheesecake to adjust to the outside temperature. This also helps prevent the cheesecake from cracking. Set aside to cool. Before releasing the cheesecake from the springform pan, insert a butterknife around the sides and circle around the cheesecake. Set aside to cool completely. Top with berries and frosting if you so desire*!

*Note: Do not decorate with berries and frosting until a few hours before you intend on presenting or serving this dish. Be careful also to let the cheesecake completely cool, otherwise your frosting will start to melt.

 
33 Comments

Posted by on December 26, 2011 in Cheesecake, Chocolate, Dark Chocolate, Dessert


Tags: , , , , , , , ,